
Downsample and crop videos#
The Downsample Videos tool is the safest way to prepare a folder of lab videos for analysis. It lets you:
set one folder-wide default configuration,
override only the videos that need special treatment,
crop videos interactively or by coordinates,
assign a different crop to one specific video during folder review,
keep a per-video processing record for reproducibility.
If you only have a single video, the same dialog works as a simple one-off rescale tool. Folder input unlocks the per-video review workflow, including custom crops for individual videos.
For a visual walkthrough of the full batch workflow, see Batch downsampling with sequential video review.
Recommended workflow#
Open
File>Downsample Videos.Choose an input folder that contains your videos.
Open the
Processingtab and set the default values that should apply to most videos.If one or more videos need different settings, click
Review Videos One by One (Folder Input).Review the
Summarytab to confirm the batch settings before you run it.Use
Save & Nextfor exceptions, including a one-off crop on a single video, andSkipfor videos that should keep the folder defaults.Open the
Runtab and start processing.
This pattern keeps the default case simple and makes the unusual cases explicit.
Step 1: Choose input and output#
Input Folder: choose the folder that contains the original videos.
Output Folder: choose where the processed videos should be written.
Use a separate output folder. That keeps the source data unchanged and makes the output easier to review.
If you leave the output folder blank, Annolid writes to a sibling folder with the same name plus _downsampled appended.
If you choose a single video instead of a folder, the tool behaves like a one-file processor and writes to a sibling _downsampled folder unless you choose a custom output directory.
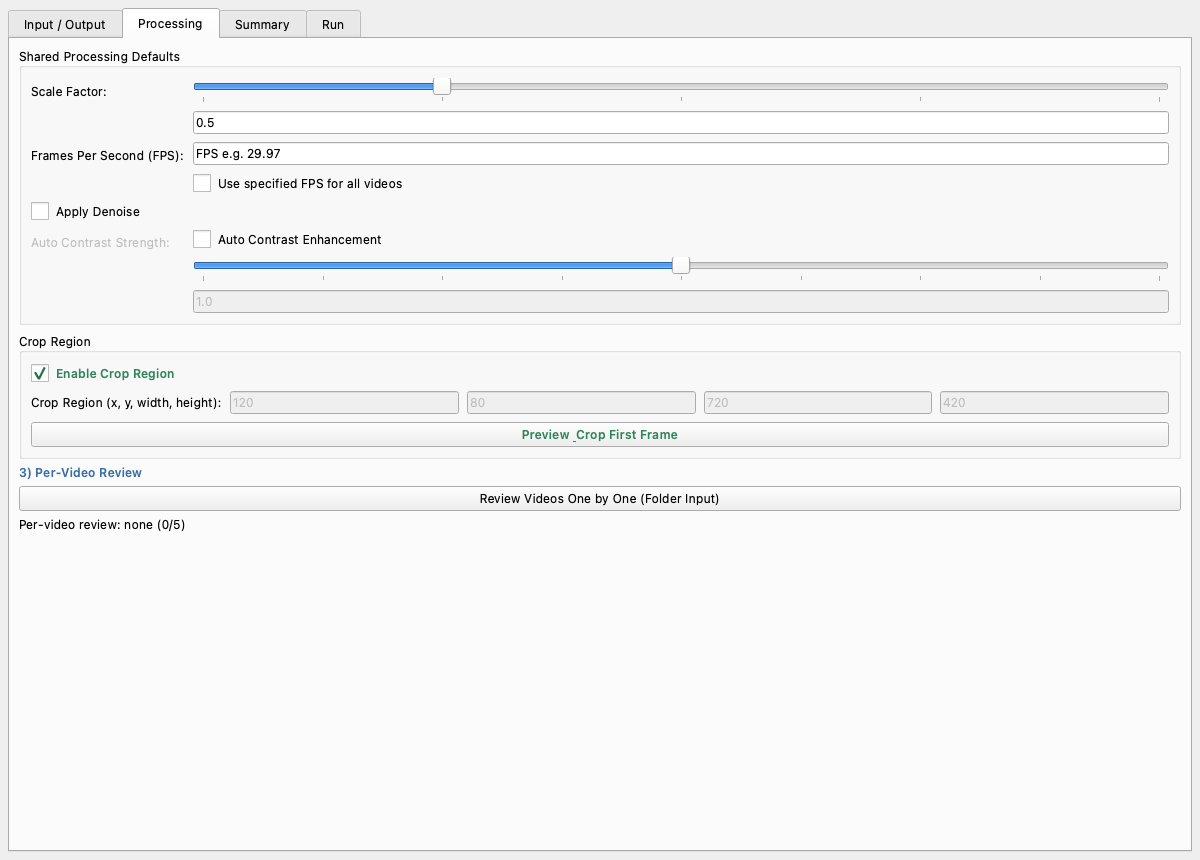
Step 2: Set folder-wide defaults#
These values are applied to every video unless you later override a specific file.
Scale Factor: use
0.5to halve the resolution,0.25to quarter it, and so on.FPS: check
Use specified FPS for all videosonly if you want a fixed frame rate.Codec:
libx264is a good default for compatibility.Apply Denoise: helpful for noisy recordings.
Auto Contrast: useful for dark or uneven videos.
Crop Region: use this if the same crop applies to every video in the folder.
Step 3: Define a crop region#
There are two ways to crop.
Interactive crop#
Click
Preview & Crop First Frame.Draw the region on the first frame.
Confirm the crop.
Make sure
Enable Crop Regionis checked.
Manual crop#
If you already know the coordinates, enter:
xywidthheight
The crop is only applied when the checkbox is enabled and all four values are valid integers. When you review a folder one video at a time, you can replace that shared crop with a custom crop on just the selected video.
Step 4: Customize individual videos#
Click Review Videos One by One (Folder Input) to open the sequential review dialog.
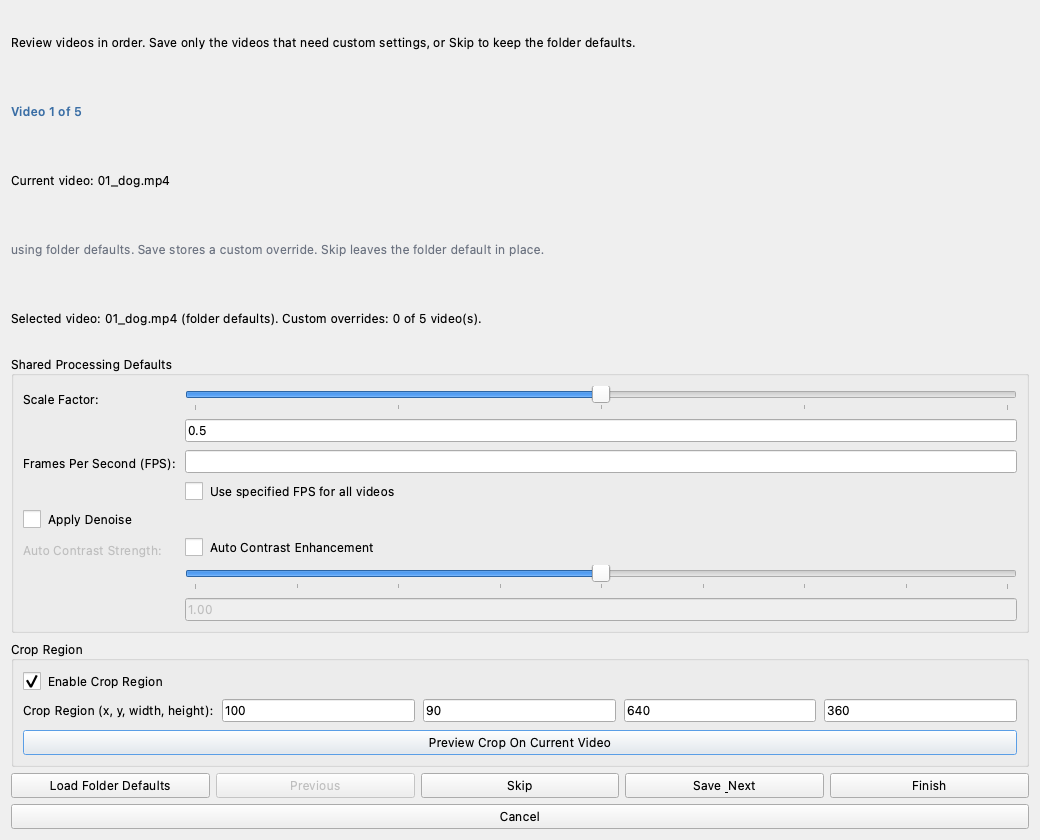
Inside that dialog:
review one video at a time,
adjust only the fields that should differ from the folder defaults,
optionally preview and set a crop for that one file,
click
Save & Nextto store the exception,click
Skipto keep the folder defaults for that file.
The dialog shows the current video position and the number of videos that already have custom settings.
Step 5: Run processing#
Choose one or both actions:
Rescale Video writes processed videos to the output folder.
Collect Metadata Only writes
metadata.csvand per-video summary files without re-encoding.
Click Run Processing when you are ready.
Processing happens one video at a time. Each video uses its effective settings:
folder defaults, or
that video’s custom override.
What the output contains#
For each processed video, Annolid writes:
the processed video file,
a matching
.mdreport,metadata.csvin the output folder.
The report records:
input mode and source,
the effective parameters used for that video,
the FFmpeg command that was executed,
the final metadata for the generated file.
This makes it possible to rerun or audit a batch later.
Example workflows#
One default crop for the whole folder#
Use this when all videos were recorded with the same setup and only need one shared crop.
Set folder defaults.
Enable crop and choose the region.
Run processing.
One special video in a mostly uniform folder#
Use this when one video has a different camera position or a bad frame rate.
Set folder defaults for the common case.
Open the per-video review dialog.
Review videos in order.
Change only the outlier video.
Click
Save & Nextfor that file to store its custom crop or other override.Run processing.
Reuse the same custom configuration everywhere#
If the first video is the correct template for the rest of the folder:
Open the per-video review dialog.
Configure the template video.
Repeat the same settings for the remaining files as needed.
Run processing.
Troubleshooting#
If a crop is ignored, check that
Enable Crop Regionis on.If a video is skipped, confirm that the file is a supported video format and that FFmpeg can read it.
If the FPS field is left blank in a per-video review, the tool uses that video’s original FPS.
If you want to keep a file on the batch default, use
Skipfor that file.
Practical guidance#
Keep defaults conservative.
Use reviews only for true exceptions.
Prefer one output folder per processing run.
Treat the generated
.mdreports as the audit trail for the batch.